
Warm weather means golf carts are on the move once again. Whether you’re hitting the links or tooling around the neighborhood, there’s something freeing about gliding through the fresh spring air after a long winter indoors. But what happens when that first turn of the key is met with silence, or your smooth ride suddenly feels sluggish?
It’s common for batteries to need a bit of TLC after a long winter — especially if they’ve been stored improperly. In this article, we’ll break down the signs of a failing golf cart battery and offer a step-by-step guide for replacing it.
Ready to roll?
3 Signs It’s Time to Replace Your Golf Cart Battery
Golf cart batteries have an average lifespan of three to five years. Even if you aren’t within that range, there are some key signs it’s time for a replacement.
- Reduced capacity. If your golf cart feels sluggish or less powerful, or takes longer to reach its full charge, it may be a sign of reduced capacity — or the decreased ability to hold a charge and deliver power. Signs of reduced capacity include:
- Inability to travel the same distance as before on a single charge.
- Slower acceleration than average.
- Longer charge time.
- Difficulty climbing hills.
- Swelling, bulging or leaking. If you see any of these on your golf cart battery, discontinue use and replace it immediately. Visible signs of damage like bulging, leaking and cracking mean your battery has reached the end of its lifespan. There are a number of things that can cause battery damage, including:
- Excessive overcharging.
- Physical damage from dropping or improper installation.
- Exposure to extreme temperatures.
- Sulfation, or a buildup of lead sulfate crystals on the battery plates.
- Low or uneven voltage reading. It’s a good idea to periodically test your battery’s voltage, especially at the start of a new season. Fully charge your batteries and test using a multimeter or hydrometer, depending on the type of batteries in your cart. Fully charged, deep-cycle batteries should read at the following levels:
- 12-volt: 12.7 volts or higher
- 8-volt: 8.4 volts or higher
- 6-volt: 6.3 volts or higher
Check with the manufacturer or battery retailer for details about your specific type of battery. If you don’t feel comfortable testing your batteries at home, bring them to your nearest Continental Battery Systems retailer for an accurate test.
Choosing the Right Replacement Battery
Most golf carts do not have a single battery. Instead, your cart runs on a series of 6-volt, 8-volt or 12-volt golf cart batteries to supply the necessary voltage and amperage for operation. Typical golf carts require either 36 volts or 48 volts, which has to do with how much power the golf cart has. Amperage determines how far your cart can travel before recharging.
Check manufacturer specifications for your golf cart or electric vehicle for voltage and amperage, then find the battery you need here.
In addition to voltage, golf cart batteries come in different chemistries. The primary types are flooded lead-acid, AGM, Gel and lithium golf cart batteries.
| Type of Golf Cart Battery | Benefits | Drawbacks |
| Flooded Lead-Acid (FLA) |
|
|
| Absorbent Glass Mat (AGM) |
|
|
| Gel |
|
Can be more expensive than FLA and AGM |
| Lithium-ion |
|
|
Regardless of the type of batteries powering your golf cart, it’s best practice to change them all out at once, even if only one is faulty. Mixing old batteries with new ones can lead to imbalanced charging and discharging cycles, putting more strain on all the batteries and reducing the overall performance of your cart.
How to Replace Your Golf Cart Battery: Step-By-Step
Step 1: Preparation and Safety
Gather your tools.
- Wrench set
- Personal protective equipment, including safety glasses and heavy-duty gloves
- Baking soda and water mixture and a wire brush to clean the battery bay
- Battery strap
- Battery charger
Start with safety. Before starting, make sure your golf cart is turned off and the key is removed. Wear safety glasses and rubber gloves to protect against acid spills and corrosion.
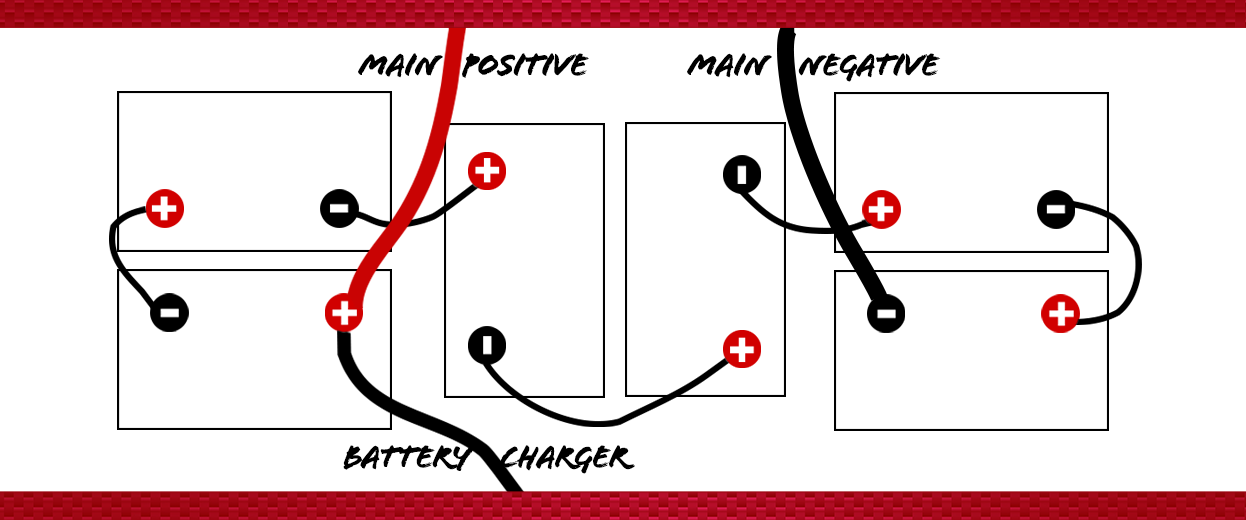
Take a picture. Start by taking a photo of the battery layout inside your cart. You can also make a sketch identifying the connection points, including the main negative and main positive. This will help you replace the batteries in the correct configuration.
Step 2: Remove the Old Batteries
Locate the battery compartment. You’ll typically find it up front under the seat.
Disconnect the batteries. Start by disconnecting the main negative followed by the main positive. The main cables connect to a terminal and not to another battery. Once the main cables are disconnected, disconnect any accessories. Finally, remove the remaining cables.
Remove the batteries. Using your battery strap, remove each cell from the battery bay. Clean the battery bay with a baking soda and water solution. Scrub any grime or corrosion with a wire brush and dry with a clean towel.
Step 3: Install the New Batteries
Refer to the diagram and pictures to ensure you have the correct layout and placement. Once the batteries are in place, it’s time to reconnect them.
Reconnect the batteries. Referring to your diagram, reconnect the batteries in the reverse order from how you removed them. Start with cables that connect the batteries to each other, then accessories, and finally, the main positive and main negative batteries.
Check your work. Refer to your photo and drawing again to ensure the batteries are installed and connected correctly.
Secure the batteries. Make sure to replace the battery hold-downs that secure your battery in the bay.
Step 4: Charge and Test
Charge your battery. The new batteries should come with some charge, but ensure they are fully charged before taking your cart out for its first run. Remember to change the setting on your charger to match the type of battery (AGM, FLA, Gel or Lithium).
Hit the green! Turn on your cart and test all lights and electronics. Ensure you can move both backward and forward. Then, head out for a cruise around the course.
Step 5: Return Your Old Battery
Bring your spent batteries to your nearest Continental Battery Systems retailer, where they will be recycled.
Tips for Extending the Life of Your Golf Cart Battery
Good battery maintenance and storage will help you get the most out of your new golf cart batteries.
- Recharge batteries as needed. Keep batteries charged at about 80%; never let them fully discharge.
- Water your FLA battery. Regularly check the water level on flooded batteries and fill halfway between the top of the plate and the bottom of the case with distilled water. Batteries should be fully charged before you fill them.
- Minimize use in extreme weather. Golf carts are usually tucked away in the freezing months, but heat can also affect your battery life. Limit use on the hottest days, and park in cool or well-shaded areas.
- Regularly check and test your battery. Conduct visual inspections at the start and end of each season and periodic voltage tests.
- Store batteries properly. Remove the batteries from your golf cart if they will sit idle for long periods. Make sure batteries are charged and keep them in a climate-controlled area. Using a battery maintainer that automatically charges as needed can ensure continued battery health during downtimes.